ການ ນຳ ໃຊ້ໂປແກຼມແລະໂປແກຼມ PyGObject ເປັນ ".deb" ແພັກເກດ ສຳ ລັບ Linux Desktop - ພາກ 4
ພວກເຮົາສືບຕໍ່ຊຸດການຂຽນໂປແກຼມ PyGObject ກັບທ່ານໃນ ໜ້າ ຈໍ Linux, ໃນສ່ວນ 4 ຂອງຊຸດພວກເຮົາຈະອະທິບາຍວິທີການຫຸ້ມຫໍ່ໂປແກຼມແລະໂປແກຼມທີ່ພວກເຮົາສ້າງ ສຳ ລັບ Linux desktop ໂດຍໃຊ້ PyGObject ເປັນຊຸດ Debian.

ບັນດາຊຸດ Debian ( .deb ) ແມ່ນຮູບແບບທີ່ຖືກ ນຳ ໃຊ້ຫຼາຍທີ່ສຸດໃນການຕິດຕັ້ງໂປຣແກຣມພາຍໃຕ້ Linux, ລະບົບ“ dpkg ” ທີ່ກ່ຽວຂ້ອງກັບ .deb ແມ່ນ ຄ່າເລີ່ມຕົ້ນຂອງການແຈກແຈງ Linux ທີ່ອີງໃສ່ Debian ເຊັ່ນ Ubuntu ແລະ Linux Mint. ນັ້ນແມ່ນເຫດຜົນທີ່ພວກເຮົາພຽງແຕ່ຈະອະທິບາຍວິທີການຫຸ້ມຫໍ່ໂປແກຼມຂອງພວກເຮົາ ສຳ ລັບ Debian.
ສ້າງຊຸດ Debian ຈາກໂປແກຼມ PyGObject ຂອງທ່ານ
ຫນ້າທໍາອິດ, ທ່ານຄວນມີຄວາມຮູ້ພື້ນຖານບາງຢ່າງກ່ຽວກັບການສ້າງຊຸດ Debian, ຄູ່ມືຕໍ່ໄປນີ້ຈະຊ່ວຍທ່ານໄດ້ຫຼາຍ.
<
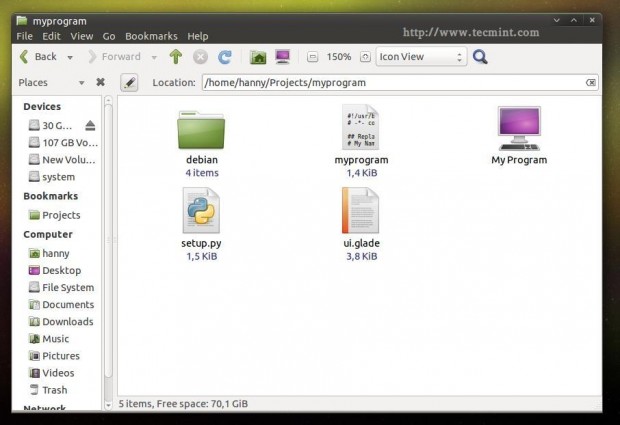
ສະຫຼຸບໂດຍຫຍໍ້, ຖ້າທ່ານມີໂຄງການທີ່ເອີ້ນວ່າ " myprogram " ມັນຕ້ອງມີເອກະສານແລະແຟ້ມດັ່ງຕໍ່ໄປນີ້ເພື່ອໃຫ້ທ່ານສາມາດຫຸ້ມຫໍ່ມັນໄດ້.
<
ໂຄງການຂອງທ່ານ.
ແນ່ນອນ .. ມັນມີເອກະສານແລະແຟ້ມເອກະສານອື່ນໆອີກຫຼາຍຢ່າງທີ່ທ່ານສາມາດປະກອບເຂົ້າໃນໂຄງການຂອງທ່ານ (ໃນຄວາມເປັນຈິງທ່ານສາມາດລວມເອົາທຸກໆຢ່າງທີ່ທ່ານຕ້ອງການ) ແຕ່ມັນແມ່ນບັນດາພື້ນຖານ.
ດຽວນີ້, ເລີ່ມຕົ້ນຈັດໂຄງການ. ສ້າງໂຟນເດີ ໃໝ່ ທີ່ມີຊື່ວ່າ " myprogram ", ສ້າງແຟ້ມທີ່ມີຊື່ວ່າ " myprogram " ແລະຕື່ມໃສ່ລະຫັດຕໍ່ໄປນີ້ໃສ່ມັນ.
#!/usr/bin/python
# -*- coding: utf-8 -*-

## Replace your name and email.
# My Name <[email >

## Here you must add the license of the file, replace "MyProgram" with your program name.
# License:
#    MyProgram is free software: you can redistribute it and/or modify
#    it under the terms of the GNU General Public License as published by
#    the Free Software Foundation, either version 3 of the License, or
#    (at your option) any later version.
#
#    MyProgram is distributed in the hope that it will be useful,
#    but WITHOUT ANY WARRANTY; without even the implied warranty of
#    MERCHANTABILITY or FITNESS FOR A PARTICULAR PURPOSE.  See the
#    GNU General Public License for more details.
#
#    You should have received a copy of the GNU General Public License
#    along with MyProgram.  If not, see <http://www.gnu.org/licenses/>.

from gi.repository import Gtk
import os

class Handler:

  def openterminal(self, button):
    ## When the user clicks on the first button, the terminal will be opened.
    os.system("x-terminal-emulator ")

  def closeprogram(self, button):
    Gtk.main_quit()

# Nothing new here.. We just imported the 'ui.glade' file.
builder = Gtk.Builder()
builder.add_from_file("/usr/lib/myprogram/ui.glade")
builder.connect_signals(Handler())
window = builder.get_object("window1")
window.connect("delete-event", Gtk.main_quit)
window.show_all()
Gtk.main()
ສ້າງເອກະສານ ui.glade ແລະຕື່ມຂໍ້ມູນໃສ່ກັບລະຫັດນີ້.
<?xml version="1.0" encoding="UTF-8"?>
<!-- Generated with glade 3.16.1 -->
<interface>
  <requires lib="gtk+" version="3.10"/>
  <object class="GtkWindow" id="window1">
    <property name="can_focus">False</property>
    <property name="title" translatable="yes">My Program</property>
    <property name="window_position">center</property>
    <property name="icon_name">applications-utilities</property>
    <property name="gravity">center</property>
    <child>
      <object class="GtkBox" id="box1">
        <property name="visible">True</property>
        <property name="can_focus">False</property>
        <property name="margin_left">5</property>
        <property name="margin_right">5</property>
        <property name="margin_top">5</property>
        <property name="margin_bottom">5</property>
        <property name="orientation">vertical</property>
        <property name="homogeneous">True</property>
        <child>
          <object class="GtkLabel" id="label1">
            <property name="visible">True</property>
            <property name="can_focus">False</property>
            <property name="label" translatable="yes">Welcome to this Test Program !</property>
          </object>
          <packing>
            <property name="expand">False</property>
            <property name="fill">True</property>
            <property name="position">0</property>
          </packing>
        </child>
        <child>
          <object class="GtkButton" id="button2">
            <property name="label" translatable="yes">Click on me to open the Terminal</property>
            <property name="visible">True</property>
            <property name="can_focus">True</property>
            <property name="receives_default">True</property>
            <signal name="clicked" handler="openterminal" swapped="no"/>
          </object>
          <packing>
            <property name="expand">False</property>
            <property name="fill">True</property>
            <property name="position">1</property>
          </packing>
        </child>
        <child>
          <object class="GtkButton" id="button3">
            <property name="label">gtk-preferences</property>
            <property name="visible">True</property>
            <property name="can_focus">True</property>
            <property name="receives_default">True</property>
            <property name="use_stock">True</property>
          </object>
          <packing>
            <property name="expand">False</property>
            <property name="fill">True</property>
            <property name="position">2</property>
          </packing>
        </child>
        <child>
          <object class="GtkButton" id="button4">
            <property name="label">gtk-about</property>
            <property name="visible">True</property>
            <property name="can_focus">True</property>
            <property name="receives_default">True</property>
            <property name="use_stock">True</property>
          </object>
          <packing>
            <property name="expand">False</property>
            <property name="fill">True</property>
            <property name="position">3</property>
          </packing>
        </child>
        <child>
          <object class="GtkButton" id="button1">
            <property name="label">gtk-close</property>
            <property name="visible">True</property>
            <property name="can_focus">True</property>
            <property name="receives_default">True</property>
            <property name="use_stock">True</property>
            <signal name="clicked" handler="closeprogram" swapped="no"/>
          </object>
          <packing>
            <property name="expand">False</property>
            <property name="fill">True</property>
            <property name="position">4</property>
          </packing>
        </child>
      </object>
    </child>
  </object>
</interface>
ບໍ່ມີຫຍັງ ໃໝ່ ຈົນຮອດດຽວນີ້ .. ພວກເຮົາຫາກໍ່ສ້າງແຟ້ມ Python ແລະເອກະສານໂຕ້ຕອບຂອງມັນ. ຕອນນີ້ສ້າງແຟ້ມ“ setup.py ” ຢູ່ໃນໂຟນເດີດຽວກັນ, ແລະເພີ່ມລະຫັດຕໍ່ໄປນີ້ໃສ່ມັນ, ທຸກໆເສັ້ນຈະຖືກອະທິບາຍໃນ ຄຳ ເຫັນ.
# Here we imported the 'setup' module which allows us to install Python scripts to the local system beside performing some other tasks, you can find the documentation here: https://docs.python.org/2/distutils/apiref.html
from distutils.core import setup

setup(name = "myprogram", # Name of the program.
      version = "1.0", # Version of the program.
      description = "An easy-to-use web interface to create & share pastes easily", # You don't need any help here.
      author = "TecMint", # Nor here.
      author_email = "[email ",# Nor here :D
      url = "http://example.com", # If you have a website for you program.. put it here.
      license='GPLv3', # The license of the program.
      scripts=['myprogram'], # This is the name of the main Python script file, in our case it's "myprogram", it's the file that we added under the "myprogram" folder.

# Here you can choose where do you want to install your files on the local system, the "myprogram" file will be automatically installed in its correct place later, so you have only to choose where do you want to install the optional files that you shape with the Python script
      data_files = [ ("lib/myprogram", ["ui.glade"]), # This is going to install the "ui.glade" file under the /usr/lib/myprogram path.
                     ("share/applications", ["myprogram.desktop"]) ] ) # And this is going to install the .desktop file under the /usr/share/applications folder, all the folder are automatically installed under the /usr folder in your root partition, you don't need to add "/usr/ to the path.
ດຽວນີ້ສ້າງແຟ້ມ“ myprogram.desktop ” ຢູ່ໃນໂຟນເດີດຽວກັນ, ແລະເພີ່ມລະຫັດດັ່ງຕໍ່ໄປນີ້, ມັນໄດ້ຖືກອະທິບາຍເຊັ່ນດຽວກັນໃນ ຄຳ ເຫັນ.
# This is the .desktop file, this file is the responsible file about showing your application in the applications menu in any desktop interface, it's important to add this file to your project, you can view more details about this file from here: https://developer.gnome.org/integration-guide/stable/desktop-files.html.en
[Desktop Entry]
# The default name of the program.
Name=My Program
# The name of the program in the Arabic language, this name will be used to display the application under the applications menu when the default language of the system is Arabic, use the languages codes to change the name for each language.
Name[ar]=برنامجي
# Description of the file.
Comment=A simple test program developed by me.
# Description of the file in Arabic.
Comment[ar]=برنامج تجريبي بسيط تم تطويره بواسطتي.
# The command that's going to be executed when the application is launched from the applications menu, you can enter the name of the Python script or the full path if you want like /usr/bin/myprogram
Exec=myprogram
# Do you want to run your program from the terminal?
Terminal=false
# Leave this like that.
Type=Application
# Enter the name of the icon you want to use for the application, you can enter a path for the icon as well like /usr/share/pixmaps/icon.png but make sure to include the icon.png file in your project folder first and in the setup.py file as well. Here we'll use the "system" icon for now.
Icon=system
# The category of the file, you can view the available categories from the freedesktop website.
Categories=GNOME;GTK;Utility;
StartupNotify=false
ພວກເຮົາເກືອບຈະເຮັດຢູ່ທີ່ນີ້ແລ້ວ. ລະບົບ.
ເປີດ“ debian ” ໂຟນເດີ, ແລະສ້າງແຟ້ມເອກະສານຕໍ່ໄປນີ້.
control
compat
changelog
rules

ຄວບຄຸມ : ເອກະສານນີ້ໃຫ້ຂໍ້ມູນພື້ນຖານກ່ຽວກັບຊຸດ Debian, ສຳ ລັບລາຍລະອຽດເພີ່ມເຕີມ, ກະລຸນາເຂົ້າໄປເບິ່ງໃນເຂດຂໍ້ມູນການຄວບຄຸມຊຸດ Debian.
Source: myprogram
Maintainer: My Name <[email >
Section: utils
Priority: optional
Standards-Version: 3.9.2
Build-Depends: debhelper (>= 9), python2.7

Package: myprogram
Architecture: all
Depends: python-gi
Description: My Program
Here you can add a short description about your program.
ເຂົ້າກັນໄດ້ : ນີ້ແມ່ນເອກະສານ ສຳ ຄັນ ສຳ ລັບລະບົບ dpkg, ມັນພຽງແຕ່ປະກອບມີເລກ 9 ອັນມະຫັດສະຈັນ, ປ່ອຍໃຫ້ມັນເປັນແບບນັ້ນ.
9
changelog : ທີ່ນີ້ທ່ານຈະສາມາດເພີ່ມການປ່ຽນແປງທີ່ທ່ານເຮັດໃນໂປແກຼມຂອງທ່ານ, ສຳ ລັບຂໍ້ມູນເພີ່ມເຕີມ, ກະລຸນາເຂົ້າເບິ່ງແຫຼ່ງຂໍ້ມູນ Debian Package Changelog.
myprogram (1.0) trusty; urgency=medium

  * Add the new features here.
  * Continue adding new changes here.
  * And here.

 -- My Name Here <[email >  Sat, 27 Dec 2014 21:36:33 +0200
ກົດລະບຽບ : ເອກະສານນີ້ມີຄວາມຮັບຜິດຊອບໃນການ ດຳ ເນີນຂັ້ນຕອນການຕິດຕັ້ງຢູ່ໃນເຄື່ອງທ້ອງຖິ່ນເພື່ອຕິດຕັ້ງຊຸດ, ທ່ານສາມາດເບິ່ງຂໍ້ມູນເພີ່ມເຕີມ
ກ່ຽວກັບເອກະສານນີ້ຈາກບ່ອນນີ້: ກົດລະບຽບປົກກະຕິກ່ຽວກັບການຫຸ້ມຫໍ່ Debian.
ເຖິງແມ່ນວ່າທ່ານຈະບໍ່ຕ້ອງການຫຍັງອີກຕໍ່ໄປ ສຳ ລັບໂປແກຼມ Python ຂອງທ່ານ.
#!/usr/bin/make -f
# This file is responsible about running the installation process on the local machine to install the package, you can view more information about this file from here: https://www.debian.org/doc/manuals/maint-guide/dreq.en.html#defaultrules Though you won't need anything more for your Python program.
%:
    dh [email
override_dh_auto_install:
    python setup.py install --root=debian/myprogram --install-layout=deb --install-scripts=/usr/bin/ # This is going to run the setup.py file to install the program as a Python script on the system, it's also going to install the "myprogram" script under /usr/bin/ using the --install-scripts option, DON'T FORGET TO REPLACE "myprogram" WITH YOUR PROGRAM NAME.
override_dh_auto_build:
ດຽວນີ້ແມ່ນວ່າພວກເຮົາໄດ້ສ້າງທຸກເອກະສານທີ່ ຈຳ ເປັນ ສຳ ລັບໂປແກມຂອງພວກເຮົາຢ່າງ ສຳ ເລັດຜົນ, ຕອນນີ້ເລີ່ມຕົ້ນການຫຸ້ມຫໍ່ມັນ. ກ່ອນອື່ນ ໝົດ, ໃຫ້ແນ່ໃຈວ່າທ່ານໄດ້ຕິດຕັ້ງເພິ່ງພາບາງຢ່າງ ສຳ ລັບຂັ້ນຕອນການກໍ່ສ້າງກ່ອນທີ່ທ່ານຈະເລີ່ມຕົ້ນ.
$ sudo apt-get update
$ sudo apt-get install devscripts
ຕອນນີ້ຈິນຕະນາການວ່າໂຟນເດີ myprogram ” ຢູ່ໃນໂຟນເດີທີ່ຢູ່ເຮືອນຂອງທ່ານ (/home/user/myprogram ) ເພື່ອຈັດເປັນຊຸດ Debian, ໃຫ້ ດຳ ເນີນການ ຄຳ ສັ່ງຕໍ່ໄປນີ້.
$ cd /home/user/myprogram
$ debuild -us -uc
[email :~/Projects/myprogram$
debuild -us -uc dpkg-buildpackage -rfakeroot -D -us -uc
dpkg-buildpackage: source package myprogram
dpkg-buildpackage: source version 1.0
dpkg-buildpackage: source distribution trusty
dpkg-buildpackage: source changed by My Name Here
<[email >
dpkg-source --before-build myprogram
dpkg-buildpackage: host architecture i386
fakeroot debian/rules clean
dh clean
dh_testdir
dh_auto_clean
....
.....
Finished running lintian.
ນັ້ນແມ່ນມັນ! ຊຸດ Debian ຂອງທ່ານຖືກສ້າງຂື້ນຢ່າງປະສົບຜົນ ສຳ ເລັດ:

ໃນຄໍາສັ່ງທີ່ຈະຕິດຕັ້ງມັນໃນການແຈກຈ່າຍທີ່ອີງໃສ່ Debian, ດໍາເນີນການ.
$ sudo dpkg -i myprogram_1.0_all.deb
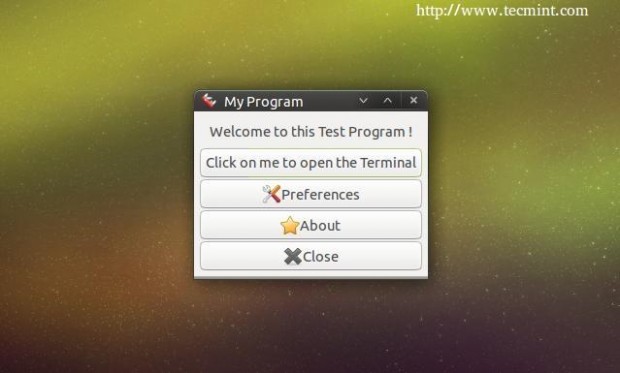
ຢ່າລືມທີ່ຈະປ່ຽນເອກະສານຂ້າງເທິງດ້ວຍຊື່ຂອງຊຸດ .. ດຽວນີ້ຫລັງຈາກທ່ານຕິດຕັ້ງແພັກເກັດ, ທ່ານສາມາດແລ່ນໂປແກຼມຈາກເມນູສະ ໝັກ ໄດ້.

ແລະມັນກໍ່ຈະເຮັດວຽກ ..
ໃນບົດຮຽນຕໍ່ໄປພວກເຮົາຈະອະທິບາຍວິທີການຄົ້ນຄ້ວາ ຄຳ ຮ້ອງສະ ໝັກ ຂອງ PyGObject ໃຫ້ງ່າຍຂື້ນ, ຈົນກວ່າຈະຕິດຕາມເບິ່ງມັນ…